How to Install a Wall-Mounted Ballet Barre: Step-by-Step Guide
Installing a wall-mounted ballet barre is a straightforward project that can be completed in a few hours with basic tools. Proper installation is essential for safety, stability, and long-term performance. This comprehensive guide walks you through the entire process, from planning to final testing.
Whether you're installing a wood barre or a metal barre, the installation process is similar. The key to a successful installation is finding the right wall studs, ensuring proper height, and securing the brackets correctly.
Before You Begin: What You'll Need
Before starting your installation, gather all necessary tools and materials. Having everything ready will make the process smoother and help ensure a professional result.
Required Tools
- Stud finder - Essential for locating wall studs
- Level - To ensure your barre is perfectly horizontal
- Drill - With appropriate drill bits for pilot holes
- Measuring tape - For accurate height and spacing measurements
- Pencil - For marking positions on the wall
- Screwdriver - A hand screwdriver (Phillips head) is good for not overtightening screws
- Safety glasses - Important when drilling
Materials Included with PrimaBarre
Your PrimaBarre wall-mounted barre comes with:
- Mounting brackets and hardware
- Installation instructions for your barre
If you need additional brackets or hardware, you can purchase individual brackets separately.
Step 1: Determine the Correct Height
Before marking any positions on your wall, you need to determine the correct height for your barre. This is crucial for proper alignment and comfortable use.
For the primary user: Stand naturally with feet flat on the floor. Measure from the floor to the top of your hip bone (iliac crest). This measurement is your ideal barre height.
Standard heights:
- Adults: Typically 38-42 inches from floor
- Children: Varies by age and height (see our height guide for details)
If multiple users will use the barre, consider an adjustable height barre that can accommodate different heights.
Step 2: Choose the Installation Location
Selecting the right location for your barre is important for both functionality and safety. Consider these factors:
Wall Requirements
- Solid wall: The wall must be able to support the weight and force applied during use
- Stud availability: You need access to wall studs (typically 16 inches apart) or solid masonry
- Clearance: Ensure there's enough space in front of the barre for exercises
- Height clearance: Make sure there's adequate ceiling height for arm movements
Room Considerations
- Choose a location with good lighting
- Ensure the floor is level and provides good footing
- Consider proximity to mirrors if you use them during practice
- Make sure the location allows for proper ventilation
Step 3: Locate Wall Studs
Finding and marking wall studs is the most critical step in the installation process. Wall studs provide the structural support needed to safely mount your barre.
Using a Stud Finder
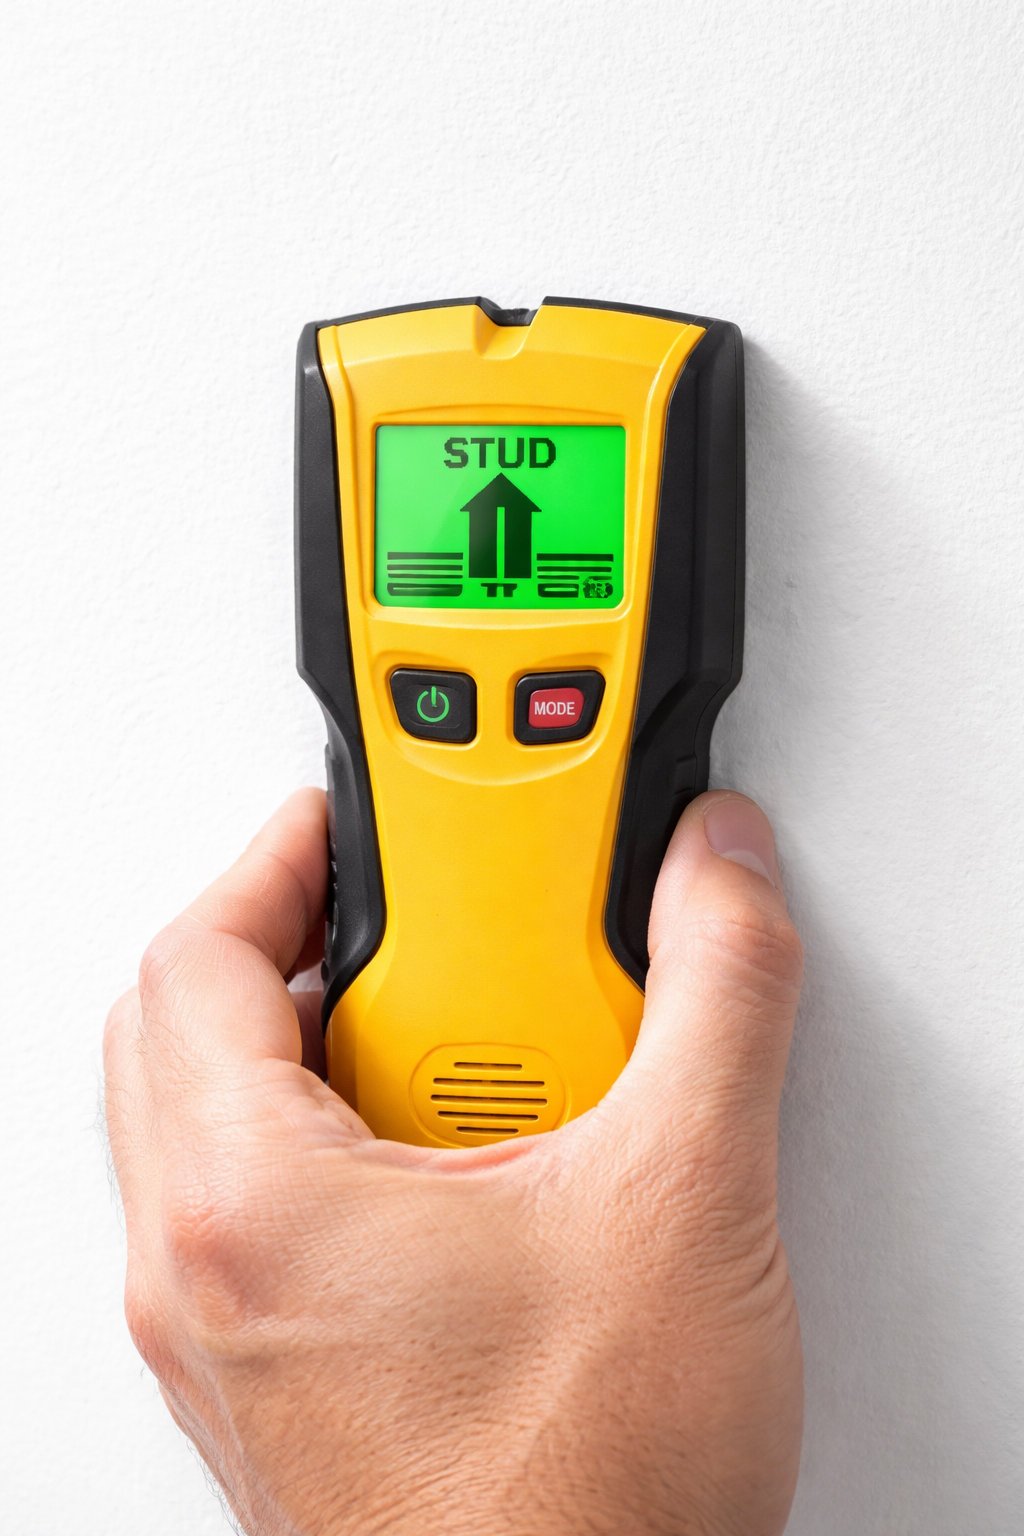
How to use a stud finder:
- Turn on your stud finder and calibrate it according to manufacturer instructions
- Place it flat against the wall at the height where you'll install the barre
- Move it slowly across the wall horizontally
- Mark where the stud finder indicates a stud (usually with a beep or light)
- Verify by checking multiple points vertically along the stud
Stud spacing: In most homes, studs are spaced 16 inches apart (center to center). Some older homes may have 24-inch spacing.
Step 4: Mark Bracket Positions
Once you've located the studs, mark where the brackets will be mounted. Proper spacing ensures your barre is level and securely supported.
Bracket Spacing
Each of our wall barre product pages have a detailed image showing the recommended spacing for your specific barre. To find this, go to the wood barre or metal barre product page, choose your barre size, and then find the image that says "Recommended Bracket Spacing."
You have a bit more flexibility with bracket placement if using a backer board. This is typically a piece of wood that is secured at multiple points to the studs in the wall, and then the brackets may be mounted to the backer board.
General rule: It's a good idea to space brackets no more than 4-5 feet apart for optimal support. And always mount in line with stud centers for maximum strength.
Marking the Wall
- At the center of your chosen studs, place a mark at your desired barre height. Use a pencil so you can easily erase.
- Next, place another mark about 3¼" lower than your desired barre height. This will be your mounting point for the top screw. (Because of the brackets’ upward sweep, the mounting point will be lower than the actual barre height).
- Double-check with your stud finder that this lower mark is still in the center of a stud.
- Place a mark 3" below your last one. This will be for the bracket’s bottom screw.
- Hold up a bracket to these marks and verify that your holes are correctly spaced. Adjust if needed.
- Repeat steps 1-5 for each bracket mounting point. Tip: use a level to double-check accuracy between marks.
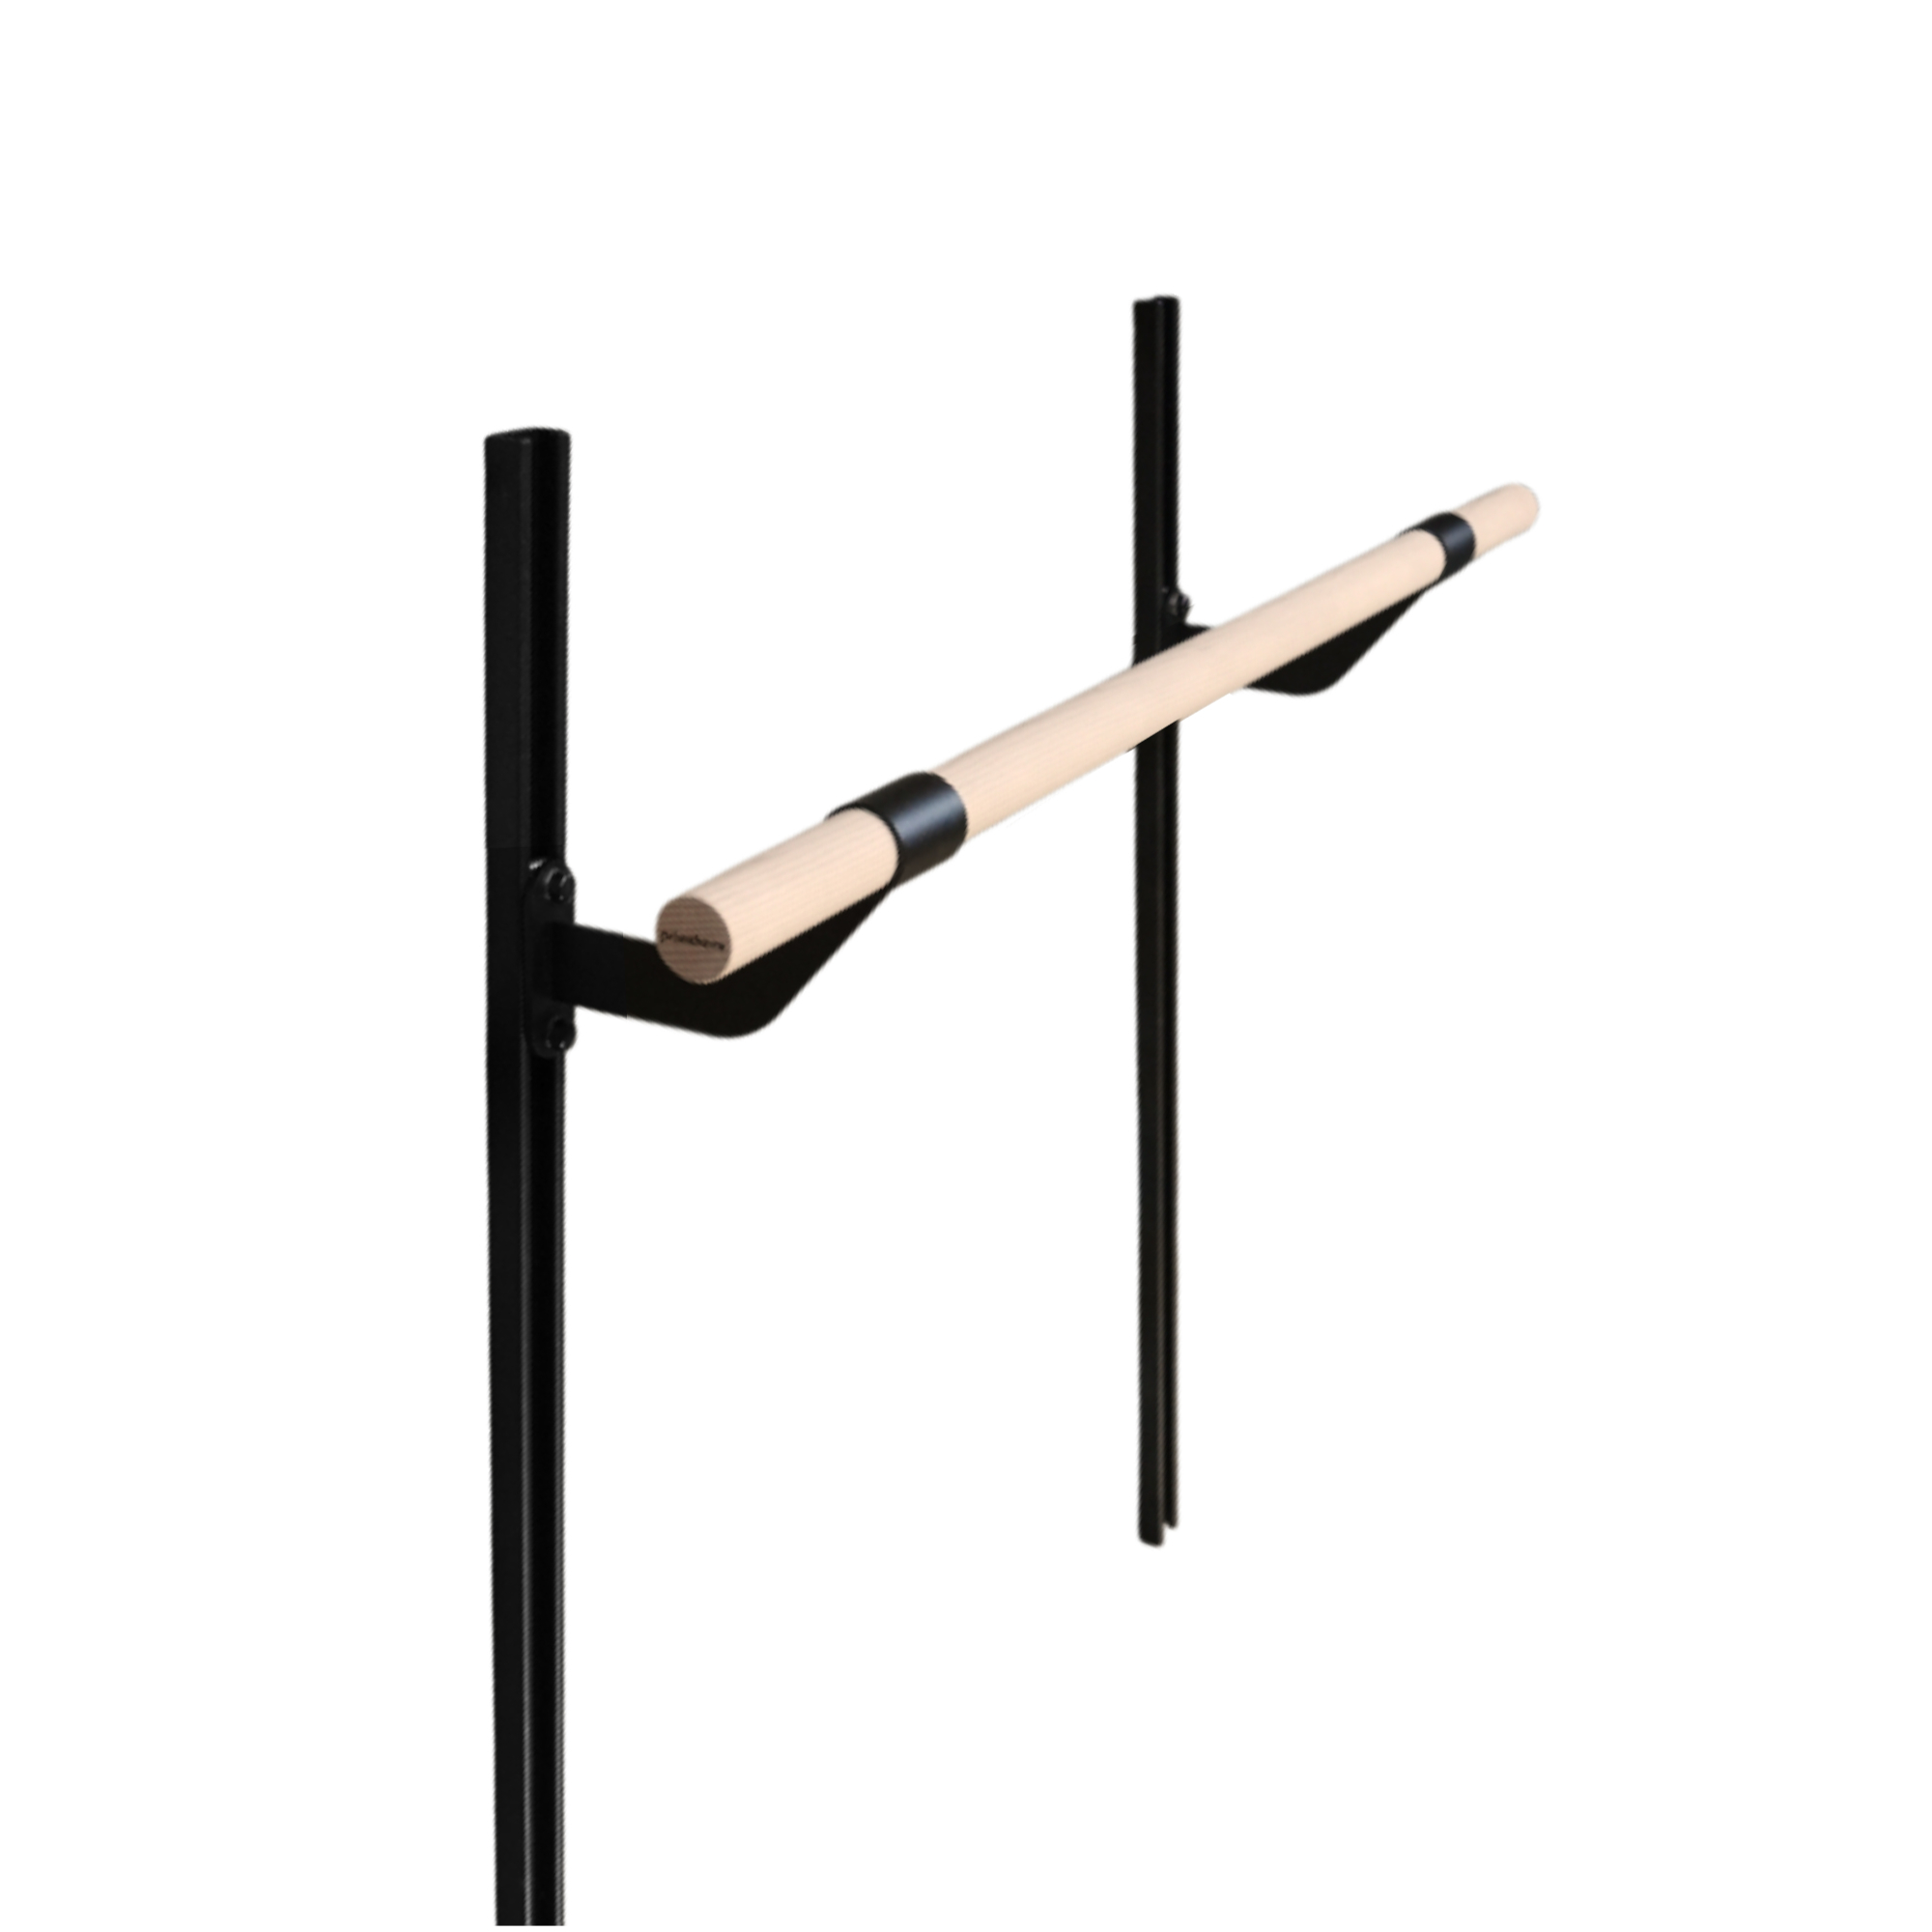
Step 5: Install the Brackets
With your bracket positions marked, you're ready to install the brackets.
Note: Do not mount brackets on, or drill through, mirrors or other breakable objects - it will crack them!Install Brackets
- Drill 1/8" pilot holes into the wall/studs.
- Install brackets using supplied ¼" lag bolts and washers.
- Tighten lag bolts and attach the supplied bolt cover caps.
Insert the Barre
- Slide your barre(s) into the brackets
- If joining multiple pieces to form a long barre, position them such that each barre meets halfway into the bracket collars. You may leave a small gap to help spacing.
- Secure barres using the included bracket collar screws (two per bracket) into the bottom of the brackets. Tip: drill a ⅛" pilot hole for easier installation of screws for wood barres.
- Ensure that the ends of the barre on both sides do not extend more than 12 inches beyond the last bracket for best support.
Step 6: Test and Verify Installation
Before using your barre, perform a thorough safety check to ensure everything is properly installed.
Safety Checklist
- Stability test: Gently apply pressure to the barre at various points. It should feel solid with no movement
- Level check: Verify the barre is perfectly horizontal using your level
- Height verification: Confirm the height is correct for the primary user
- Bracket inspection: Check that all brackets are securely attached with no visible gaps
- Screw tightness: Ensure all screws are tight (but not over-tightened)
- Clearance check: Verify there's adequate space around the barre for exercises
Initial Use
Start with light exercises to test the installation. Gradually increase the intensity as you become confident in the barre's stability. If you notice any movement, looseness, or concerns, stop using the barre and address the issue immediately.
Special Installation Considerations
Installing on Masonry or Concrete
For masonry or concrete walls, you'll need:
- Masonry drill bits
- Appropriate masonry anchors (sleeve anchors, wedge anchors, or similar)
- A hammer drill for drilling into concrete
Follow the anchor manufacturer's instructions for proper installation.
Installing Adjustable Height Barres
If you're installing an adjustable height barre, the process is similar but involves mounting tracks instead of fixed brackets. The tracks allow the barre to be adjusted up and down while maintaining stability.
Key differences:
- Mount tracks instead of brackets
- Ensure tracks are vertical and parallel
- Mount tracks at a few points along the stud
- Test the adjustment mechanism after installation
Common Installation Mistakes to Avoid
Being aware of common mistakes can help you avoid problems during installation:
- Not finding studs: Always verify stud locations before drilling
- Incorrect height: Measure carefully and double-check before marking
- Uneven brackets: Use a level for every bracket to ensure they're all at the same height
- Insufficient support: Don't space brackets too far apart
- Over-tightening: Tighten screws securely but avoid stripping threads
- Rushing: Take your time to ensure everything is done correctly
When to Call a Professional
While many installations can be completed as a DIY project, consider hiring a professional if:
- You're unsure about wall structure or stud locations
- You need to install on masonry or concrete and don't have the proper tools
- The installation location presents unique challenges
- You're not comfortable with basic construction tasks
- You want to ensure maximum safety and professional results
A professional installer can ensure your barre is mounted safely and correctly, giving you peace of mind.
Maintenance After Installation
Once your barre is installed, regular maintenance will keep it performing well:
- Periodic checks: Every few months, check that all screws remain tight
- Stability test: Regularly test the barre for any movement or looseness
- Bracket inspection: Look for any signs of wear or damage to brackets
- Cleaning: Keep the barre clean according to material type (see our wood vs metal guide for care tips)
Final Thoughts
Installing a wall-mounted ballet barre is a rewarding project that brings professional-quality practice equipment into your home. With proper planning, the right tools, and careful attention to detail, you can achieve a secure, level installation that will serve you well for years.
Remember: Take your time, measure twice, and always prioritize safety. If you're ever unsure about any step, don't hesitate to consult a professional or reach out to PrimaBarre customer support for guidance.
At PrimaBarre, we're committed to helping you get the most out of your barre. All our products are made in the USA with professional-grade quality, designed to provide years of reliable use when properly installed.
Why Choose PrimaBarre?
PrimaBarre is committed to creating the world's best barres for dance and fitness. Our products are:
- Made in the USA with premium materials
- Designed with feedback from professional dancers and instructors
- Built to last with a 10-year warranty
- Available in multiple sizes and configurations
- Backed by dedicated customer support
Ready to Install Your Barre?
Shop our selection of professional-grade wall-mounted ballet barres, all made in the USA with free shipping and complete installation hardware.